Cisco switches are essential networking devices that provide connectivity between different devices on a network. They come in different sizes and configurations to meet the varying needs of different organizations. In this blog post, we will discuss the initial configuration of Cisco switches to get them up and running.
Before we start, it is important to note that there are different ways to configure a Cisco switch, including using the command-line interface (CLI) or using a graphical user interface (GUI). In this post, we will focus on configuring the switch using the CLI.
Table of Contents
Step 1: Connect to the Switch
To configure a Cisco switch, you will need to establish a connection to the switch. You can do this by using a console cable to connect your computer to the switch or by using a Telnet or SSH session.
To connect using an intermediate protocol such as console, SSH or telnet, we need a program or agent. There are many alternative applications. But for the simplest and most common use you can use PUTTY. You can download PUTTY from here.
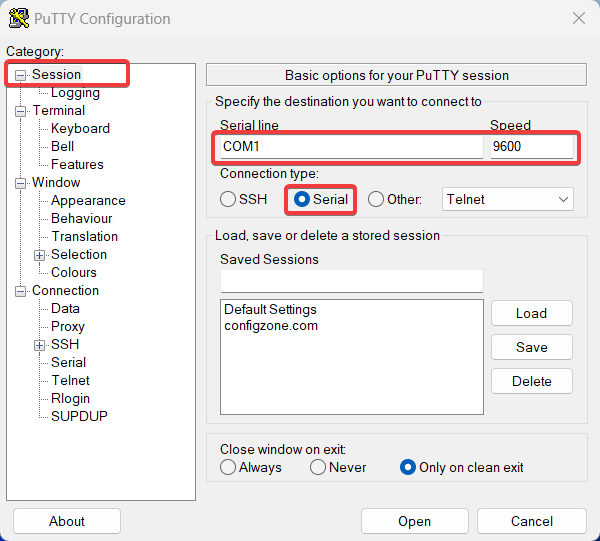
This is how it will open after you install Putty (you can use portable if you want).

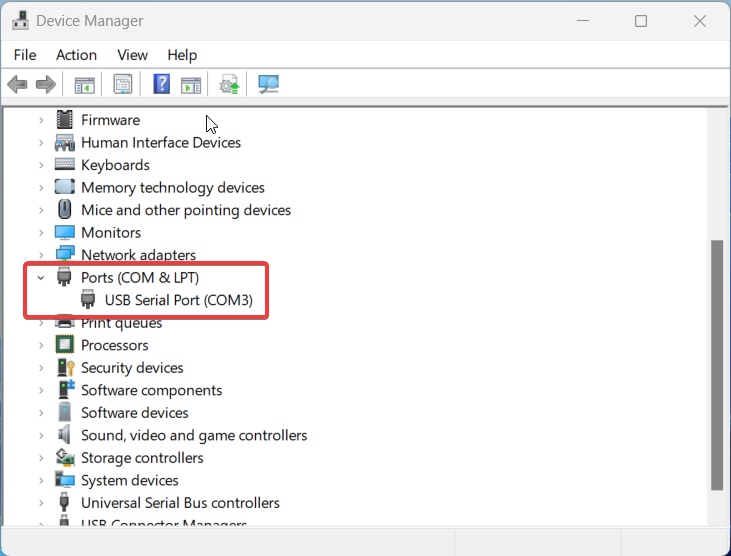
The point you need to pay attention here is what COM is. COM1 comes standard. You can find out how many COM from device manager. Of course you must have a converter.

Step 2: Enter the Configuration Mode
Once you have established a connection to the switch, you will need to enter the configuration mode. You can do this by entering the enable command followed by the configure terminal command:
Switch> enable
Switch# configure terminal
Step 3: Configure the Basic Settings
Next, you will need to configure the basic settings for the switch. This includes setting the hostname, setting the domain name, and configuring passwords. Here is an example of how to set the hostname and domain name:
Switch(config)# hostname MY-SWITCH
MY-SWITCH(config)# ip domain-name configzone.com
Step 4: Configure the Management Interface
The management interface is used to remotely manage the switch. By default, the management interface is VLAN 1. It is recommended that you create a separate management VLAN and assign the IP address to that VLAN. Here is an example of how to configure the management VLAN and assign an IP address to it:
MY-SWITCH(config)# interface vlan 10
MY-SWITCH(config-if)# ip address 10.0.0.1 255.255.255.0
MY-SWITCH(config-if)# no shutdown
Step 5: Configure the Switchports
Switchports are used to connect devices to the switch. By default, all ports on a Cisco switch are configured as access ports. You can configure the switchports as access ports, trunk ports, or other types of ports depending on your network requirements. Here is an example of how to configure a switchport as an access port:
MY-SWITCH(config)# interface gigabitEthernet 1/0/1
MY-SWITCH(config-if)# switchport mode access
MY-SWITCH(config-if)# switchport access vlan 10
MY-SWITCH(config-if)# no shutdown
Based on the example provided, after configuring gigabitEthernet 1/0/1 as an access port and assigning it to VLAN 10, the switch will connect to any device that is connected to that specific port. We assigned gigbitEthernet1/0/1 to vlan 10. If we connect our rj45 cable to this port, we can access the switch. Of course since there is no DHCP configuration here. We need to set our IPv4 settings. For example the computer ip address: 10.0.0.0.10 255.255.255.255.0, we can now ping 10.0.0.1 via gigabitEthernet 1/0/1. If our SSH settings are set, we can access with SSH.
Step 6: Create SSH user
after configuring the SSH on a router or switch, you can create a user and write the necessary configuration to SSH with that user. This will allow for secure access to the device using the SSH protocol. The exact steps for creating a user and configuring SSH access may vary depending on the specific device and operating system being used. However, generally speaking, the process involves creating a user account, configuring the user’s SSH keys, and setting up any necessary access policies or security protocols. It is important to follow best practices for SSH security, including using strong passwords or key-based authentication, limiting access to authorized users only, and regularly updating and monitoring the SSH configuration.
MY-SWITCH(config)# username admin privilege 15 password configzone
MY-SWITCH(config)#enable secret ConfigZone

MY-SWITCH(config)# line vty 0 15
MY-SWITCH(config-line)# login local
MY-SWITCH(config-line)# transport input ssh
This configures the virtual terminals (VTYs) for SSH access using the local user database.
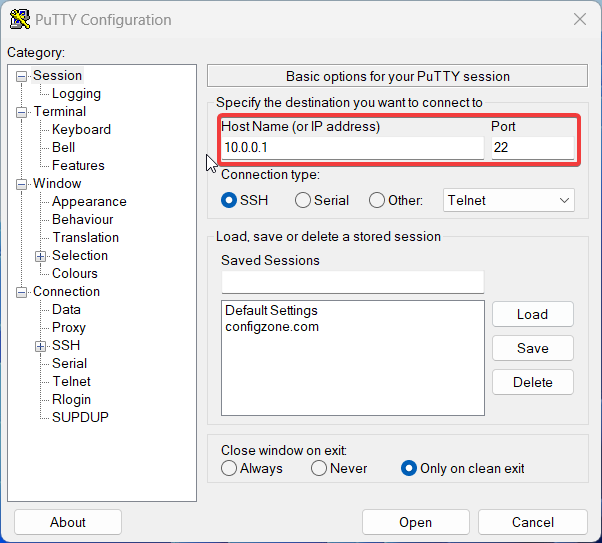
Once these steps have been completed, you can use the SSH protocol to remotely access the switch using the new user account “admin” and password. Like this:

