This script assumes you have the necessary permissions to access the Checkpoint local logs directory and upload files to the FTP server. Make sure to replace the placeholder values in the script with your actual FTP server information, username, password, local logs directory, and FTP logs directory. If you are lacking in linux script, you can review some topics here.
Table of Contents
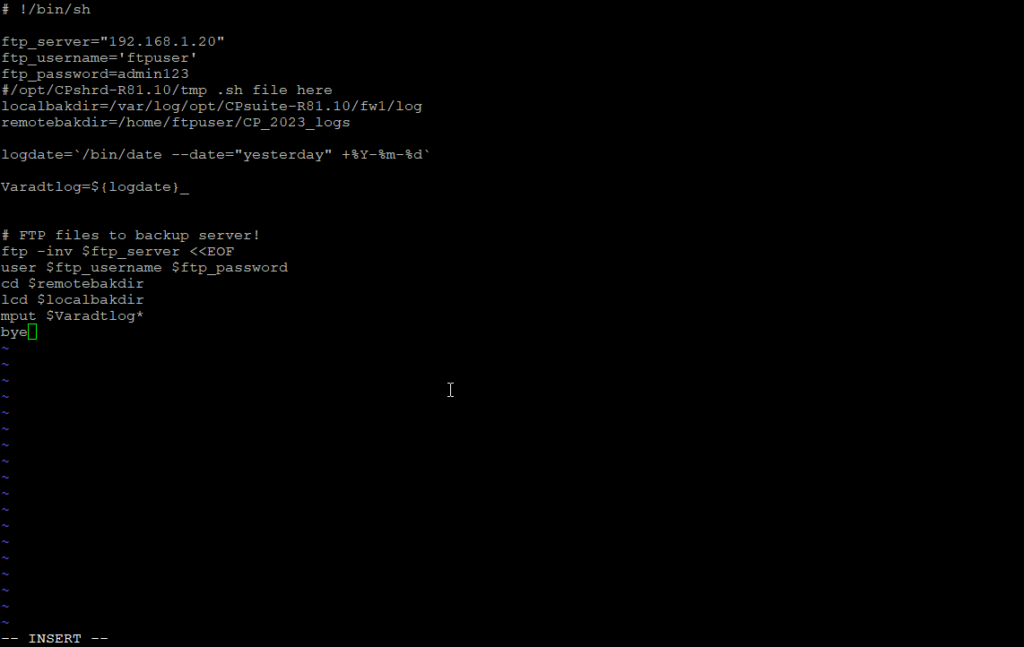
Now let me explain this script step by step.
# !/bin/sh

ftp_server="192.168.1.20"
ftp_username='ftpuser'
ftp_password=admin123

localbakdir=/var/log/opt/CPsuite-R81.10/fw1/log
remotebakdir=/home/ftpuser/CP_2023_logs

logdate=`/bin/date --date="yesterday" +%Y-%m-%d`

Varadtlog=${logdate}_

# FTP files to backup server!
ftp -inv $ftp_server <<EOF
user $ftp_username $ftp_password
cd $remotebakdir
lcd $localbakdir
mput $Varadtlog*
bye
Step 1: FTP Server
ftp_server="192.168.1.20"This line should be the ip address of the FTP server. It can be windows and linux. You can install whichever one you want. If you haven’t installed it yet, you can install an FTP server on linux here.
ftp_username='ftpuser'
ftp_password=admin123
This line is the user and password we use to access our FTP server, which is seen in two lines.
Step 2: Path
localbakdir=/var/log/opt/CPsuite-R81.10/fw1/logIn this line we show where the Checkpoint firewall logs are located. It may vary according to your version. Pay attention to the variable name. This variable and the other variable names below are important.
remotebakdir=/home/ftpuser/CP_2023_logsIn this line, we specify where the Checkpoint firewall logs will be saved on the FTP server when they are copied. I am using Ubuntu FTP server, if you are using Windows you need to specify the path accordingly.
Step 3: Create a Date Variable
logdate=`/bin/date --date="yesterday" +%Y-%m-%d`In this line I set to get the previous day’s date using linux variables. When you run this command it will assign the date to the variable 2023-05-30.
Varadtlog=${logdate}_I change the variable assignment in this line by adding _ at the end. We will use this variable to retrieve logs.
Step 4: Checkpoint Logs and Folder
In the last steps we first use a connection with the ftp server. As a recommendation, test ftp with the command line or another program. Does the user you created have access to the FTP server and the folder where you want to get the logs.
If not, after connecting to the FTP server, use the cd $remotebakdir command to access the folder on the FTP server where you want to get the logs. (We change the local path with the lcd $localbakdir command. That is, we go to the section where we will get the logs in local.
cd: change remote path
lcd: change local path
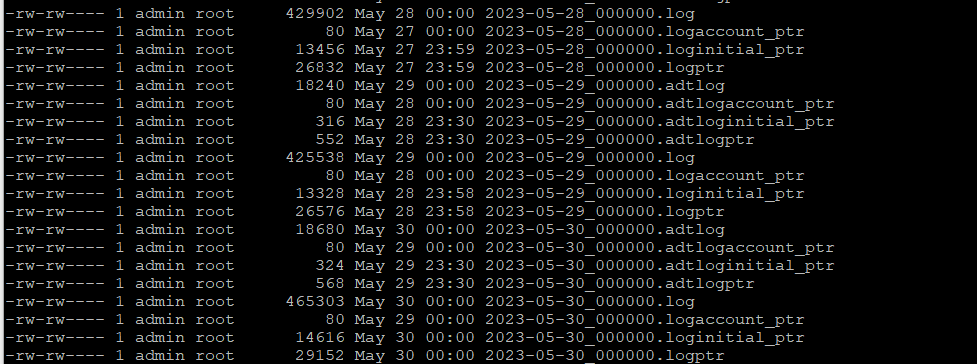
With the mput $Varadtlog* command, we specify that we will get multiple files and that these files are the ones starting with $Varadtlog. As you know, logs are indexed as in the picture below.

Step 5: Create Script
Now let’s use this script we created. First, let’s go to the /opt/CPshrd-R81.10/tmp folder. Check that we are in the correct directory with pwd.
[Expert@ConfigZone:0]# cd /opt/CPshrd-R81.10/tmp
[Expert@ConfigZone:0]# pwd
/opt/CPshrd-R81.10/tmp
[Expert@ConfigZone:0]#
Here let’s create a sh file named vi Daily_backup.sh. After creating it, let’s paste our script codes into it.
[Expert@ConfigZone:0]# vi dail_backup.shThen copy and paste the entire script above and save it.

Then we need to authorize it for execution permission. Otherwise we cannot run the script.
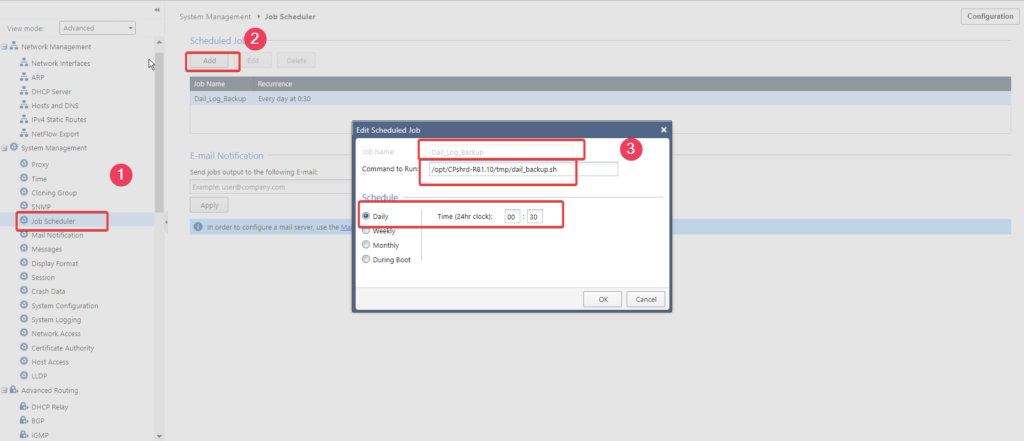
[Expert@ConfigZone:0]# chmod u+x dail_backup.shAfter authorizing it to run, we need to add it as Schedule. Connect to the Gaia interface. You should make the necessary adjustments as I show below.
Step 6: Create a Schedule with Gaia

After saying Ok, everything is ready. Now, after the first 30 minutes of each day, we will be transferring the logs of the previous day to the FTP server.
We make all such logs with reference to the previous day’s date. If you are stuck, you can contact us and we can support you.
