Table of Contents
If you are an Exchange administrator, you may need to export mailboxes to PST files for various reasons, such as backup, migration, compliance, or archiving. For example, an employee leaves the organization and you want to archive the mailbox to a PST file. By default, no user can import and export PST files in Exchange Server. Before you can do this, you need role permissions. In this blog post, you will learn how to export Exchange mailbox to PST file format with PowerShell.
Edit Mailbox Import Export role permissions
The Import Export role for Mailbox allows administrators to import and export mailbox content and clean unwanted content from a mailbox. Therefore, we need access to the Import Export role. Without access, we cannot export PST files from Exchange Server.
Get Mailbox Import Export Role
Let’s use the Get-ManagementRoleAssignment cmdlet to view who is assigned the Mailbox Import Export role.
C:\>Get-ManagementRoleAssignment -role "Mailbox Import Export" -GetEffectiveUsers | ft -AutoSize
If you want to filter the result, we can filter by account name.
C:\>Get-ManagementRoleAssignment -role "Mailbox Import Export" -GetEffectiveUsers | Where { $_.EffectiveUserName -like "User_Name_Enter" } | ft -AutoSize
Add to role assignment specific user.
C:\>New-ManagementRoleAssignment -Role "Mailbox Import Export" -User "Jane" | ft -AutoSize
The user was successfully assigned to the Mailbox Import Export role. Verify the permission.

Remove Mailbox Import Export Role
For security reasons, it’s a good idea to remove the permissions after you’re done exporting the mailbox to PST.
C:\>Get-ManagementRoleAssignment -Role "Mailbox Import Export" | Where { $_.EffectiveUserName -like "Jane" } | Remove-managementRoleAssignment

Create a Sharing Folder for the PST File Export
When exporting mailbox data as a PST file, it needs to be saved in a share folder. We will create a folder with the correct permissions. I have created a folder with the name PST on the D drive of the computer.
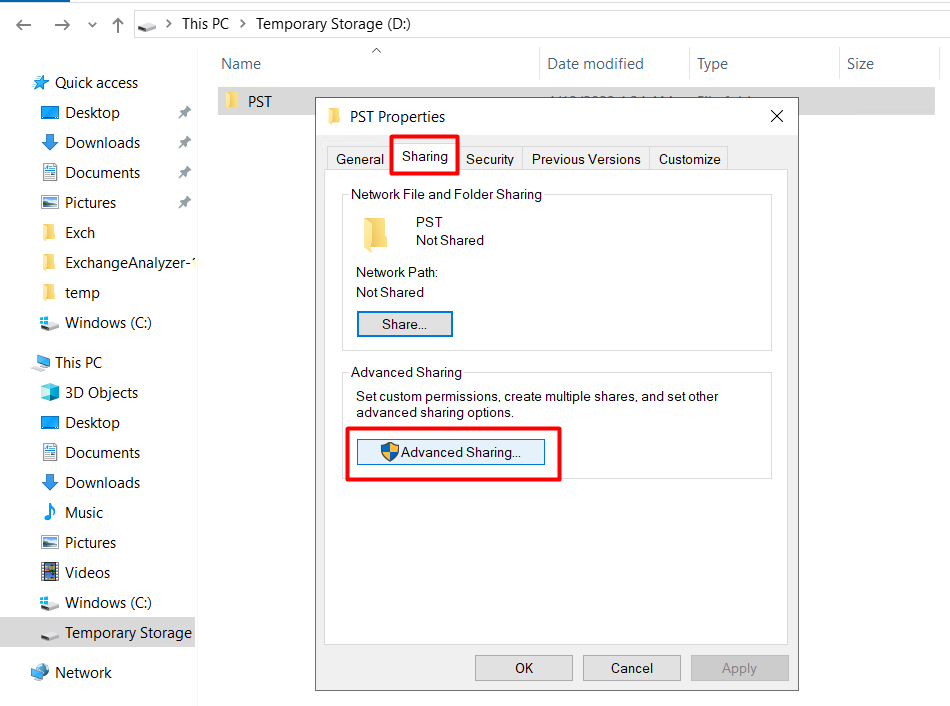
Right click on the PST folder we created, click properties and then click Sharing > Advanced Sharing.
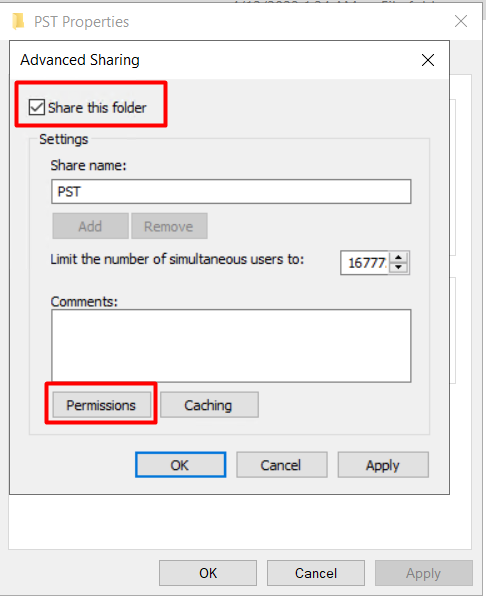
After checking “Share this folder”, click on the “Permissions” button.
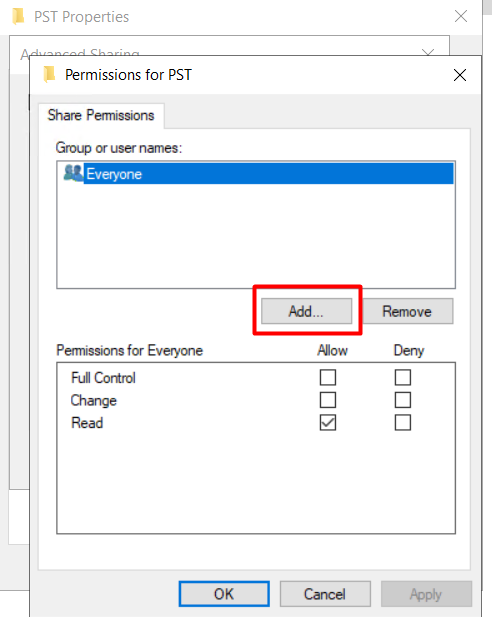
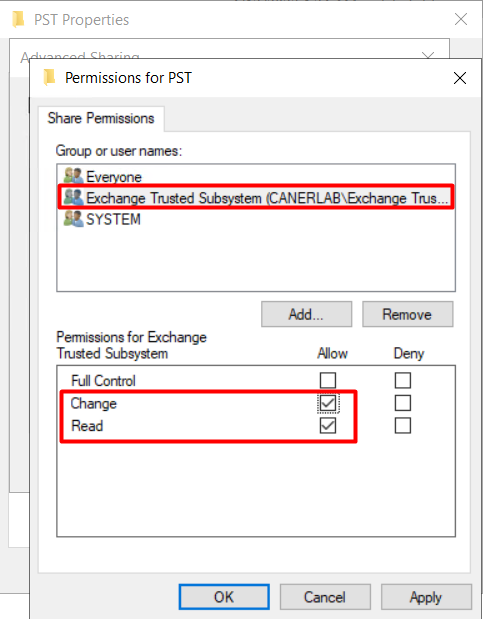
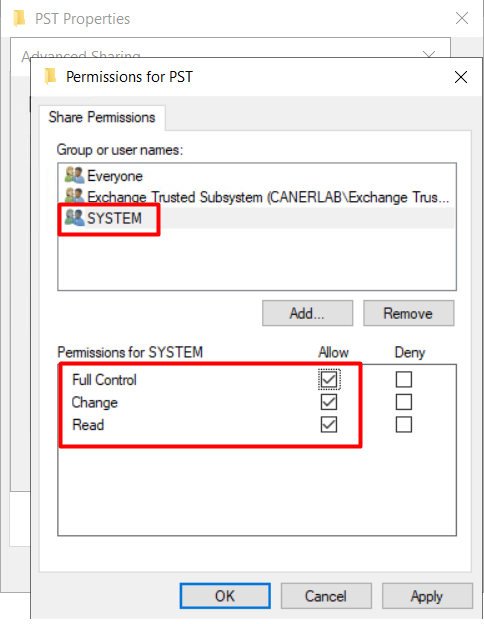
After clicking the Add button, we write the “Exchange Trusted Subsystem” and “SYSTEM” groups in the “Enter the object names to select” section.
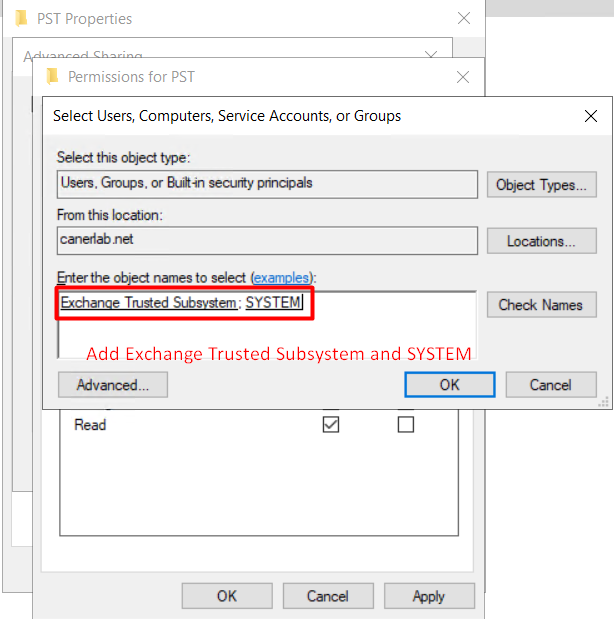
We give “Change” and “Read” permissions for “Exchange Trusted Subsystem” group and “Full Control” permission for “SYSTEM” group and click OK button.
Export Exchange mailbox to PST File with PowerShell
We use the Get-Mailbox command to display the display names of users.

C:\>New-MailboxExportRequest -Mailbox "caner" -FilePath "\\Exc01\pst\caner.pst"
Check the Status of Export Mailbox to PST
Export Mailbox status is displayed.
C:\>Get-MailboxExportRequest | Get-MailboxExportRequestStatistics
Mailbox Export status displays the size moved in the migration time.
C:\>Get-MailboxExportRequestStatistics caner | ft SourceAlias,OverallDuration,EstimatedTransferSize,BytesTransferred
Image of the PST file in the \Exc01\pst\ directory.

Export All Exchange mailbox to PST
Bulk export Exchange mailboxes to PST file commads.
C:\>$alluser = Get-Mailbox
C:\>foreach($Mailbox in $alluser){New-MailboxExportRequest -Mailbox $Mailbox.Alias -FilePath "\\Exc01\pst\$($mailbox.alias).pst"}
Clear the completed export request.
C:\>Get-MailboxExportRequest -Status Completed | Remove-MailboxExportRequest
Conclusion
In this blog post, we have shown you how to export Exchange mailbox to PST file format. We hope this post was useful and informative for you.
You can find our other Exchange Server related content here.
