Windows’ sysprep feature is used to create multiple Windows servers with similar features and save time.
In this article, we will create a base disk of Windows Server 2019 with Sysprep over Hyper-V and create a new server with this disk.
In this way, we will get our servers easily by preventing our time loss during the installation stages of virtual servers while we progress our work.
So let’s get started…
Sysprep in Hyper-V
In order to prevent the disk of our base server from conflicting with the disks of our other servers, I created 2 folders called Virtual Machines in C:\Virtual Machines\Base and Base inside it.
I set up a virtual Windows Server 2019 server in Hyper-V. The location where I saved my disk during installation was inside the Base folder in the first stage.
I have completed the settings that I need to update in the virtual machine I created and that I want to continue on the machines that will be derived from this machine. (For example; Firewall is off)
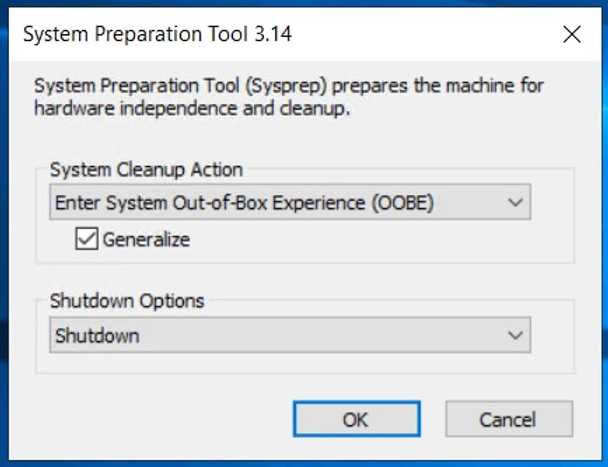
Once my machine is ready, it’s time for sysprep. Make absolutely sure that you are doing this in your virtual machine. In our virtual machine, click twice on the sysprep tool in the C:\Windows\System32\Sysprep extension. Enter System Out-of-Box Experience (OOBE), Generalize and Shutdown should be selected as in the screenshot below.

Press OK and the system will shut itself down.
After the system shutdown, this machine should no longer be turned on. Therefore, delete this server from the Virtual Machines that appear in Hyper-V.
We now have a base disk that we can use as a base and create servers as fast as we want. We should never open this disk. Otherwise all our servers derived from this disk will be corrupted.
When creating new virtual servers in Hyper-V, during Disk Creation, we select the stages up to the Choose Disk Type section by default and select Differencing at this stage.

In the Configure Disk selection, our Base Disk is selected and the disk creation phase is completed.

Then, when creating virtual machines, the Virtual Machine is created in the same way as it is created. The only thing to pay attention to is to select the base disk and select our newly created disk here.

